Saturday, November 27, 2010

Recent Paintings

Despite being such a busy holiday time,  have managed to finish 3 rather large and focal pieces of my Bretonnian Army; King Louen, The Green Knight, and a Damsel of the Lady.
Damsel
 The Damsel turned out really well. It's very hard to see in the picture, but the jewelry and scroll have exquisite detail.
I'm much more excited about the Green Knight. Not only did I layer him with 3 shades of green and gold highlights, I used a trick I picked up from painting Battle 'Mechs. I used a drybrush of a color called "Pearl" to give the whole model a shiny and metallic look. Then, instead of using matte sealer, I opted for brush on 'Ard Coat gloss. The whole model just shines, and looks very ethereal.
 His mount just shines too. I included this pic because of how his tail and legs absolutely glow. Now the model looks as intimidating as the character actually is.

 King Louen was a straight up paint. No special tricks or combos here, just a really great model. Beaquis' wings could have turned out a little better, but they still look great.
The heraldry turned out great. I also used a metallic black on the Hippogryph's claws and beak to give them a killing sheen. I guess I would be prouder of King Louen if I thought the model was as good as the Mod I did for Lord Kilmister.


I am still working on my other Bretonnian Lord mod, it took a back seat over the last couple of weeks. I find white such a pain to work with, he just got sidelined. I got the white worked out now, so he is the very next piece I am going to work on. I also started working on another piece of custom terrain, I'll post pictures as it is finished. I also have ~35 Bretonnian Men-at-Arms and Archers in  mid paint.

Plus, I am also getting ready to run a D&D 3.5 campaign, so my gaming future looks rather busy! I couldn't think of a better way to spend these cold months!


Next: That store review I never got to and D&D tools!

Thursday, November 25, 2010

Happy Tanksgiving!


Monday, November 22, 2010

Battle Report 11.21.2010

Whew. That one didn't go how I planned.

Seer Karandras' Dark Eldar concept was a solid one, but my Necrons ran much more smoothly this time. He led in kill points the first half of the game, but I was able to keep on trudging from behind and over come him in the end.
Initial Deploy

Initial Deploy

I figured since he started with only 3 skimmers, that I'd be able to tear them apart and get heavy casualties. The big flaw with his list was that he couldn't hurt the monolith.

That aside, I had a huge fight on my hands. First turn, those skimmers made it over to my half of the board, and got right up in my grill. I moved a squad of warriors up the mountain to intercept, and my monolith out and the rest of my army following. I left my Flayed Ones in reserve, so that they could outflank, a mistake against this army. They were so fast, by the time they came in (turn 3) I had to run them to get them remotely close to the combat. In hindsight, I should have had them infiltrate. Against a slower army, the outflank would have been fine, but I was too slow for the Flayed Ones to be any use at all.
They're on us!
My squad of warriors went to open up on his skimmer, and I *should* have had 24 shots raining into it, but the shadow shields on it made it so none of my guys could rapid fire and only 3 guys were in range for a single shot. Losing 6" off your range is a PAIN.


His troops all start piling out of his skimmers, and one of his Homonculi opens a webway portal right in the middle of the map to let a unit of Grotesques onto the board.
I'll give it to the Necrons here, they are resilient little buggers. SK kept knocking them down, but they kept getting back up. My Necron Lord had a squad of Immortals paired with him, and he was equipped with a Staff of Light and a Veil of Darkness. Every time SK got a squad to charge into hand to hand, the Lord would simply teleport them away, and the immortals would open fire when they reappeared. The Monolith kept the Grotesques at bay, and was the most effective piece in the game I'd say. The Nightbringer went into hand to hand with a squad of Wracks, and was very effective in cutting them down. The sad part they were just as effective against him. I HATE POISON WEAPONS! I find it hard to believe on a logical level that poison could affect a soulless machine. I'll give it against the C'Tan, but not the Necrons.... Either way, two squads of Wracks took out the Nightbringer, but they took heavy casualties. The Monolith and the Lord/Immortal Squad mopped up the rest, which is what put me up on kill points.

Since I had a squad of Flayed Ones (doing nothing, granted) out in the boonies, I never reached my phase out number, despite having the bulk of my troops obliterated. I lost a heavy amount of troops because of "powered" weapons that denied me my "We'll be back" roll, poisoned weapons that were wounding me too easily IMO, and not getting any armor saves for it at all. That part was pretty frustrating. When I was able to make my WBB rolls, I had a good ratio of success, so I probably lasted longer against this army than most others would have. I believe it was the staying power of the Necrons that let me edge out a victory here.

Overall, I was pretty satisfied with my list and how it played. I definitely learned to watch out for Dark Eldar, and what nasty tricks they have.

Sunday, November 21, 2010

Slow week on the blog, but a BUSY week in gaming!

Last Sundy: Rogue Trader
Wednesday: D&D 4th ed
Friday: Painting
Saturday: Painting
Today (Sunday): Game against Seer Karandras' Dark Eldar.
Intersperse that with work and school full time AND a family, makes that for a busy week.

Today, my revised Necron list is going to face down SK's experimental Dark Eldar army, we'll have to see how it shakes out. My last 40K game was quite the learning experience, so I hope I can use that knowledge to kick Duke Sliscus around the board.

In my marathon painting sessions over the past few days, I've completed the lastof my Necrons, and got a HUGE chunk of my Bretonnians done as well. Painting this way also reminded me of a traditoin we used to have, and one I'd like to start again: Painting Night. Once a week, Seer Karandras, Mr. O, and the Hungry Panda would get together and BS around the table while we painted. It was a very productive time. Unfortunately, due to people moving away, the group has fizzled.

I want to get a group together again to do this. I know I can count Seer Karandras in, and I have an idea of a few others to talk to about this. I also have some other ideas about future projects, but lets not show the hand too early.

Off to smack around some DE now, battle report to come!

Thursday, November 11, 2010

Battle Report 11.10.2010

Well, I totally screwed the pooch on this one, just like the n00b I am. My Necrons faced off against another Necron army of an experienced player. My list was so full of holes it looked like Jenna Jameson's underwear drawer.

I did manage to hold my two objectives, and manage to make it so he could only hold one of his, so a victory is only a technicality. I feel that I made too many mistakes, and my opponent was extremely helpful. I owe him this victory, and he gave me a lot of options to consider for future games and how to run my army.
Initial deployment

Let's recap my mistakes.
#1 (with a gauss flayer): I placed my Monolith in reserve so I could deep strike with it. I also had one squad of warriors inside, so that really handicapped me, especially since I failed my first reserve roll, so they didn't even hit the table until turn 3.

2. I set my squad of Immortals to hold an objective. Turns out, only troops can hold objectives, so I turned my hardcore warriors into target practice.

3. I ran 1 Wraith. I need to either run a whole squad, or none. My Wraith was taken out with little effort.

4. I should have had my Necron Lord in a squad. His Destroyers zoomed in, peppered him with 15 shots, and he was gone. If he had been in a squad, perhaps some of the Warriors would have absorbed the wounds, and since he had the Resurrection Orb, they would just get back up.

5. I loaded out my Necron Lord's wargear completely wrong. I need to rethink my strategy here.
   
Despite heavy fire, I press forward.

6. I used my C'tan completely wrong. I sent him straight for his Monolith. I can't believe how many 1's I rolled in the 3 turns it took me to move the Nightbringer into assault position. Apparently, he couldn't hit the broadside of barn. Once able to assault, he destroyed the Monolith in one swipe. Effective, BUT, all this time he was taking 15 shots a round from the destroyers. Once the monolith was destroyed, the squad of Warriors plus the 2 squads of Destroyers all shooting at him, he couldn't take the amount of shots coming his way.
  
Well, back to the drawing board. I definitely have a new outlook on my army, and how to better handle it. I hope my next battle report will be a victory, but a more substantial one.


Wednesday, November 10, 2010

Prepare for war!

I just finished putting the finishing touches on a Necron 1500 list, and I have an 1850 Bretonnian Army ready to go, and tonight I head out to Evolution! So, if you want to get a game in, hit me up.

Sunday, November 7, 2010

Building a gaming table at home, and on the cheap!

If you're like me, the kitchen table does NOT work for gaming. (Mine is too small, and usually is covered with something sticky, courtesy of my two sons.) Well, I am here today to tell you that building your own gaming table is possible, and very affordable.

I not only play Warhammer and 40K, but I am also an avid fan of Dungeons and Dragons, Rogue Trader, and other RPGs. So, versatility of a table is a must. Let me show you what I did.

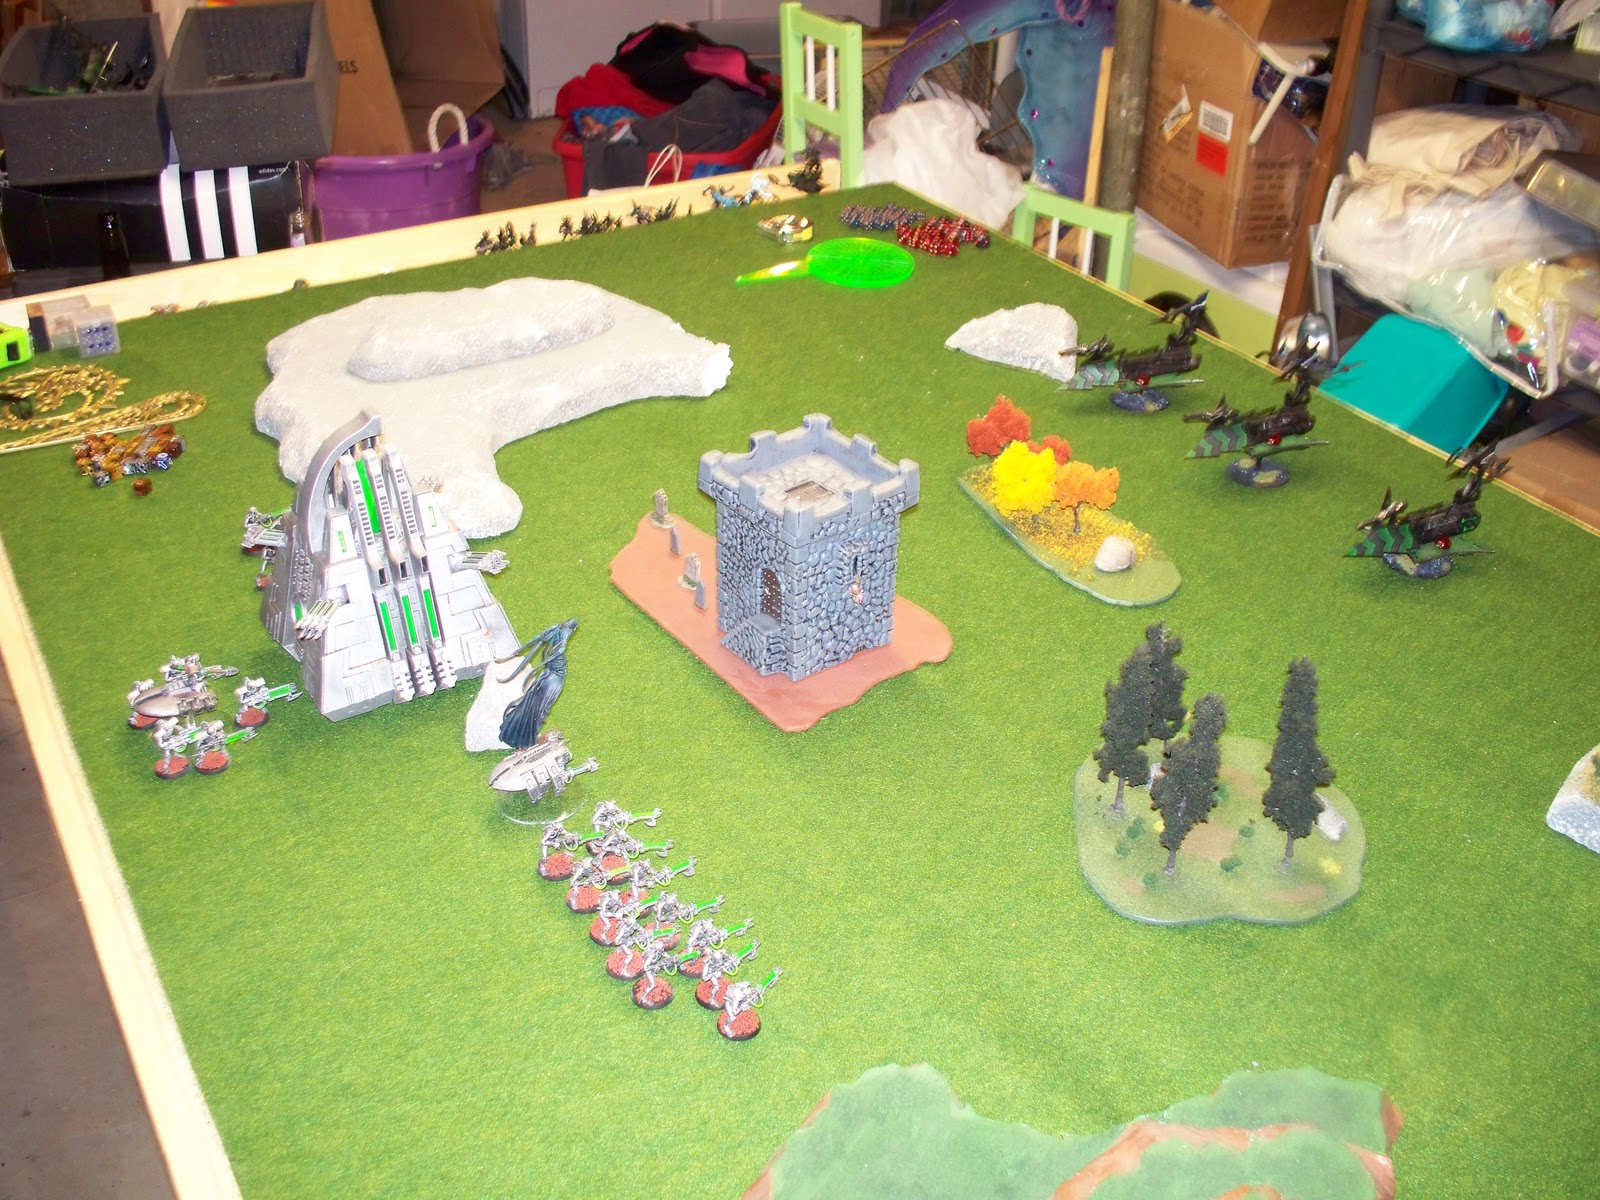
To conserve space, I not only made it a table, but I built storage into the bottom of it, a slide out drawer to add surface area, and put the table on casters so I can easily move the table around.

 You can see the braces on the bottom of the table, and since I took these pictures, I have added a few boards across the bottom so I can store all of my terrain pieces safely.

Ok, so lets talk about the cost of all of this. The surface of the table was the most expensive part, and by surface I mean the grass gaming mat I purchased for $30. I decided to splurge on this, since I constructed the rest of the table for around the same amount. There are four other methods I have seen for creating a surface, but since I use this table for RPG's, tabletop gaming, miniature gaming, and a play
 area for my kids, I wanted the grass to be removable, so that is why I went with the mat. When the guys come over for D&D, I just roll it up, and roll out the dry erase mat.
The other methods I've seen for creating a surface:
1. Flock the whole thing. Seems really expensive and labor intensive to me. The glue wouldn't always hold the flock in place, and could see patches getting worn in, and a general mess over time.
2. Spray paint. Good old inexpensive green spray paint. Durable, easy, but only will look as good as the wood you have underneath it.
3. Put sand on the table, spray paint it, then seal it.
Drawer open
 Solves the wood look issue, but messy and labor intensive.
4. Textured paint. Probably the best of the these options. It is more expensive, but it is more likely to stay in place and be durable. The big drawback in my opinion, is that it creates a rough surface, and can scrape up your miniatures. As for the cost of the paint, it's can be offset by going to Michaels, Joanne's, or Hobby Lobby and using a 40% off coupon. Those places are great for gaming supplies.
Drawer closed


Ok, back to the building cost of my table.

The surface area of the table was made from a 8' x 6' piece of OSB, cut down to 6' x 4'. ($15) OSB is great because it is heavy duty and CHEAP. Plywood ranges around $45, and solid wood, forget it. It's being covered anyway. Next, the frame of the table was constructed from 3 1" x 4" x 8' s and 4 1" x 4" x 6' s. ($1.89 and $1.59 each, respectively) I cut the 8' boards in half to go along the 4' side of the table surface.

The legs are made from 2 2" x 6" x 6' construction studs. ($3.89 each). They don't look pretty, but they are completely solid. You can cut these to your height preference, mine are at 28", same as a regular table, and are augmented by the casters I added on the bottom of the legs. (Casters were $3.98 for all 4).

For the drawer, I used the scrap 2' from the OSB board and just bought a drawer slider set with a high weight rating. ($4.99)

For the actual construction, anyone can do it. Don't be intimidated, can you draw a straight line? Use a measuring tape? Those are the hardest parts. Cutting the wood is simple, just use a circular saw and DO NOT try to cut it by hand. Invest in the tool, it's only $30 if you don't already have one, or you could just borrow one too. This whole project only took about 2 hours for me.

I started by cutting all the lumber to length. Then I assembled the 4' ends of the table. Square up the legs (ie: make sure the distance at the top is the same as the bottom. Place one of the 4' boards across the top. I have mine extend 3/4" over the top to hold the OSB surface in place and appear flush. Screw into place. Screw a second board about 6" from the bottom for a support. Repeat whole process for other side. Once your legs are built, you just line up the 6' boards and attach them. Put your last 4' boards in the center for braces and you have your frame. Flip it upside down and attach the casters. Turn it back over and set your tabletop in place. Mount the drawer slides, install the drawer and you are done! It really is that simple!

Let's recap the cost:

OSB 6' x 8'         14.99
3 8' 1"x4"              5.69
4 6' 1"x4"              6.36
2 6' 2"x6"              7.78
Casters                 3.98
Drawer slide         4.99
-----------------------------
TOTAL              43.79
Add your preferred finish to the table top, and GAME ON!

Wednesday, November 3, 2010

Concerning tips and advice

So, I just deleted the blog I was working on. I thought to myself, "Who cares?!?!?!" I need to offer my audience a unique angle, not another opinion. I was working on a review of a store I frequent when I'm visiting family down in the Detroit area. It was a rather lengthy review, but I just broke it down with one question. Why go there? If I can't answer it in a sentence, then why even review it.

I started this blog to offer tips, tricks, and insights, not to become another of the masses of naysayers out on the web.

So, with that in mind, I hit delete.

I will however, tell a great tip about glue.
It drives me absolutely insane working with super glue sometimes, especially when it doesn't set or do what I want it to do.
Loctite is the brand I prefer, and I totally recommend the gel version that comes in the black bottle. It doesn't run, and sets pretty quickly, yet gives you time to position the piece.

For basing, I found the best thing at Menard's. Loctite also offers a liquid glue in a pot with an acrylic brush. It works wonderfully for large surfaces where a bead of glue is overkill, like gluing a figure to a base.

Both glues run around the $3 mark, and a bottle will last quite some time. Usually this is cheaper than the glues offered at the hobby store, and are a better quality in my opinion.


Next Time: How to build an awesome gaming table on the cheap!!!!!!