Ah, Forge World. What a cool spiky model.
Curse you! What a spiky model!
With building any large unit, I always really want to put some extra zazz into it, and really make it into a showpiece. The Tomb Stalker is not exception. I really wanted to put an edge on the model.
In the Forge World pictures, the Tomb stalker is crawling over a piece of wreckage, and I thought that was a brilliant idea. Instead of using the aircraft that FW used, I opted for a Whirlwind hull I picked up off of eBay.
Obviously, I didn't need all the parts, so I just constructed enough of the hull to be convincing. It's going to be wreckage anyway.
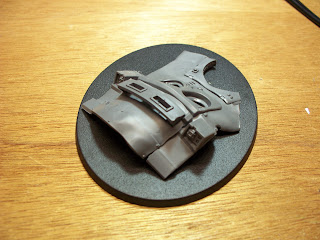
After placing the constructed hull on the base, you can see it is larger than the base. This was easy to fix, I just took a razor saw and cut the hull in half.
Once the hull was cut in half, I placed it on the base again. It was still too big, hanging slightly off of one of the edges. I cut another hunk of the back end of the hull to make it fit.
Now I lined it up against the base one more time just to double check. Fits perfectly. Now, onto the next step.
Using an emobossing tool (a glorified heat gun), I melted the hull in strategic places. A heat gun or a hairdryer that gets really hot could work too, I just use the embossing tool because it generates a small stream of very hot air. It is much easier to control than a heat gun or hairdryer. On the flip side, it does get hot, and quick! I had to move my painting mat because it began to warp under the heat.
As you can see, a few seconds under the heat and the plastic begins to melt. Using a sculpting stick, you can poke, adjust and warp the hot plastic to the desired shape.
While it is still hot, I placed the hull on the base. Pressing down lightly, to help the plastic adhere. I didn't have to use any glue here, a light bond is all I need, as I am going to sculpt the terrain up and over the wreckage.
Using some sculpey, (yes, SCULPEY!) I began to fill in the cracks between the wreck and the base. I like working with sculpey for a few different reasons. It comes in just about every color, it only costs about a $1, and it is easy to work with. I know many people prefer to use green stuff, I just can't justify spending that much on such a small amount of putty. (On a side note, I do plan to compare Green stuff/grey stuff/and other 2 part epoxy puttys in a future article). Sculpey is an "oven bake" clay, and will not harden until exposed to heat. Obviously, I cannot put the base and wreckage in the oven, but I
can use the embossing tool to cook the clay. This is a trick I've used since building terrain up around 'Mechs for Battletech. Sculpey may not be as hard as green stuff,but it isn't exactly fragile either.
Once the sculpey is hard, you can sand it. I sanded it down to remove finger prints, and add a rough texture.
The Tomb Stalker's body comes in 12 different segments, and is super poseable. Starting on the tail end, I began to glue the pieces into place, comparing it to the contour of the base.
After assembling about 5 segments, I started from the head and worked backwards. Again, I matched the contour of the base.
Once I had the tail and the head, the mid segments fell into place rather quickly.
As you can see in the picture, the Tomb Stalker is contoured right over the wreckage.
I used a few rather large lumps of sticky-tac to hold the TS in place while I worked on the legs. This part was insanely hard and time consuming, as it has 22 large legs, and 20 small ones. Only the large legs need to be positioned, and the claws on the end of the legs are seperate, and can be positioned as well.
I did not glue the TS to the base, so it will be easier to paint.
With the TS complete, it's time to move onto painting. Part 2 of this will detail the painting, and basing of the model.
Until then!


wow that looks good dude. That thing is pretty big. I think you need some dead marines on the base, it will add to the ambiance.
ReplyDeleteAgreed. Anyone want to donate some Space Marine bits???
ReplyDeleteThat's a fantastic looking model.
ReplyDeleteFrom the positioning, I get the feeling that rhino has been dead for a LONG time. It would look great rusted over and partially covered with sand.
Thank you. You read my mind with the wreckage, part 2 will cover the painting, and part 3 the basing. With any luck, I'll have both posted this weekend.
ReplyDeletevshare
ReplyDeletevshare download
vshare market
vshare apk
vshare helper
vshare ios
I get the feeling that rhino has been dead for a LONG time. It would look great rusted over and partially covered with sand.